在 MyBatis:一对一和一对多的实现 我们了解了 mybatis 如何实现一对一和一对多,它的实现方案是通过写一个SQL取出两张表结合在一起的所有数据,然后mybatis稍作处理进行返回。还有一种实现方案是,写两个单独的 SQL ,通过id等业务字段进行关联,然后分别执行,得到最终结果。这种方案,还有一个优势,就是支持延迟加载。
本节示例代码在 mybatis-demo-013 ,基于 MyBatis:一对一和一对多的实现 中的示例 mybatis-demo-012 。
数据准备
见 MyBatis:数据准备。
user表和blog表的默认内容如下:
mysql> select * from user;
+----+--------+----------------+----------+
| id | name   | email          | password |
+----+--------+----------------+----------+
|  1 | letian | letian@111.com | 123      |
|  2 | xiaosi | xiaosi@111.com | 123      |
+----+--------+----------------+----------+

mysql> select * from blog;
+----+----------+---------------+--------------+
| id | owner_id | title         | content      |
+----+----------+---------------+--------------+
|  1 |        1 | 标题1         | 文本1        |
|  2 |        1 | 标题2         | 文本2        |
|  3 |        1 | 标题3         | 文本3        |
|  4 |        1 | 标题4         | 文本4        |
|  5 |        1 | 标题5         | 文本5        |
|  6 |        2 | 标题21        | 文本21       |
|  7 |        1 | 你好, World   | 你好, 😆       |
+----+----------+---------------+--------------+
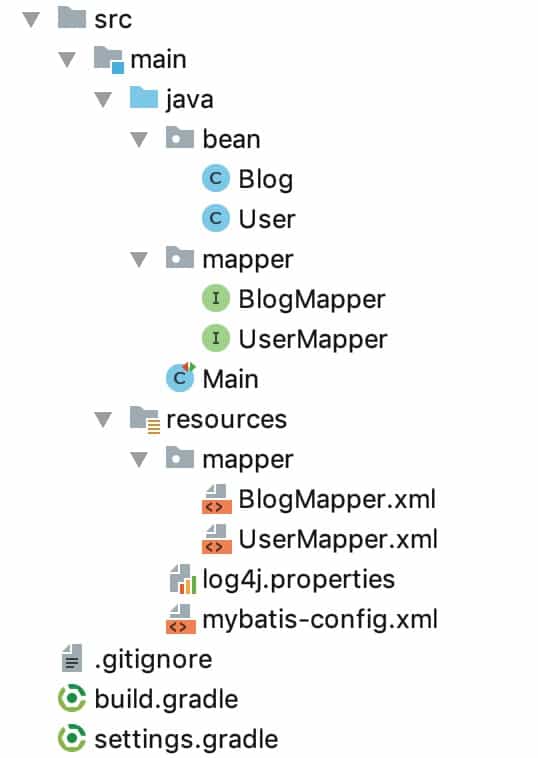
项目结构
使用 IDEA 创建 gradle 项目,最终结构如下:
根据id查询博客及其所属用户信息
在 BlogMapper 接口中新增方法:
Blog findById(Long id);
在 BlogMapper.xml 中增加映射:
<resultMap id="blogResult" type="bean.Blog">
    <result property="id" column="blog_id"/>
    <result property="ownerId" column="user_id"/>
    <result property="title" column="blog_title"/>
    <result property="content" column="blog_content"/>

    <association property="user"
                 javaType="bean.User"
                 select="findOwnerOfBlog"
                 column="user_id" />

</resultMap>

<resultMap id="userResult" type="bean.User">
    <result property="id" column="user_id"/>
    <result property="name" column="user_name"/>
    <result property="email" column="user_email"/>
    <result property="password" column="user_password"/>
</resultMap>

<select id="findById" parameterType="Long" resultMap="blogResult" resultType="bean.Blog">
    SELECT
        id AS blog_id,
        id AS user_id,
        title AS blog_title,
        content AS blog_content
    FROM
        blog
    WHERE
        id = #{id};
</select>

<select id="findOwnerOfBlog"  parameterType="int"  resultMap="userResult" resultType="bean.User">
    SELECT
        id user_id,
        name user_name,
        email user_email,
        password user_password
    FROM
        user
    WHERE
        id=#{user_id};
</select>
findById 方法是和 <select id="findById"></select>对应的。 <select id="findById"></select> 的SQL 只是从 blog表中读取数据,它的resultMap属性值是blogResult,对应<resultMap id="blogResult"></resultMap>。而 <resultMap id="blogResult"></resultMap>中的<association>使用了select和column属性:
<association property="user"
                javaType="bean.User"
                select="findOwnerOfBlog"
                column="user_id" />
selecct对应的值是findOwnerOfBlog,意思是找<select id="findOwnerOfBlog"><select>,column的值是user_id,意思是将user_id 的值传到<select id="findOwnerOfBlog"><select>中。
在 Main 类中编写示例代码:
@Test
public void test_03() throws IOException {
    SqlSession sqlSession = getSqlSession();
    BlogMapper blogMapper = sqlSession.getMapper(BlogMapper.class);
    Blog blog = blogMapper.findById(1L);
    log.info("id:{}, title:{}, content:{}", blog.getId(), blog.getTitle(), blog.getContent());
    log.info("user: {}", blog.getUser());
}
执行结果:
DEBUG [main] - Logging initialized using 'class org.apache.ibatis.logging.slf4j.Slf4jImpl' adapter.
DEBUG [main] - PooledDataSource forcefully closed/removed all connections.
DEBUG [main] - PooledDataSource forcefully closed/removed all connections.
DEBUG [main] - PooledDataSource forcefully closed/removed all connections.
DEBUG [main] - PooledDataSource forcefully closed/removed all connections.
DEBUG [main] - Opening JDBC Connection
DEBUG [main] - Created connection 278934944.
DEBUG [main] - Setting autocommit to false on JDBC Connection [com.mysql.jdbc.JDBC4Connection@10a035a0]
DEBUG [main] - ==>  Preparing: SELECT id AS blog_id, id AS user_id, title AS blog_title, content AS blog_content FROM blog WHERE id = ?;
DEBUG [main] - ==> Parameters: 1(Long)
DEBUG [main] - ====>  Preparing: SELECT id user_id, name user_name, email user_email, password user_password FROM user WHERE id=?;
DEBUG [main] - ====> Parameters: 1(Integer)
DEBUG [main] - <====      Total: 1
DEBUG [main] - <==      Total: 1
 INFO [main] - id:1, title:标题1, content:文本1
 INFO [main] - user: User(id=1, name=letian, email=letian@111.com, password=123, blogs=null)
可以看到两个SQL依次执行。
如何设置延迟加载
上面的示例中,在我们未获取 user 信息时,就已经把user信息取出来了。如何做到,用到再加载,也就是延迟加载呢?
很简单,在 mybatis-config.xml 加入:
<settings>
    <setting name="lazyLoadingEnabled" value="true"/>
    <setting name="aggressiveLazyLoading" value="false"/>
</settings>
再次执行上面的示例代码,结果是:
DEBUG [main] - Logging initialized using 'class org.apache.ibatis.logging.slf4j.Slf4jImpl' adapter.
DEBUG [main] - PooledDataSource forcefully closed/removed all connections.
DEBUG [main] - PooledDataSource forcefully closed/removed all connections.
DEBUG [main] - PooledDataSource forcefully closed/removed all connections.
DEBUG [main] - PooledDataSource forcefully closed/removed all connections.
DEBUG [main] - Opening JDBC Connection
DEBUG [main] - Created connection 1209669119.
DEBUG [main] - Setting autocommit to false on JDBC Connection [com.mysql.jdbc.JDBC4Connection@481a15ff]
DEBUG [main] - ==>  Preparing: SELECT id AS blog_id, id AS user_id, title AS blog_title, content AS blog_content FROM blog WHERE id = ?;
DEBUG [main] - ==> Parameters: 1(Long)
DEBUG [main] - <==      Total: 1
 INFO [main] - id:1, title:标题1, content:文本1
DEBUG [main] - ==>  Preparing: SELECT id user_id, name user_name, email user_email, password user_password FROM user WHERE id=?;
DEBUG [main] - ==> Parameters: 1(Integer)
DEBUG [main] - <==      Total: 1
 INFO [main] - user: User(id=1, name=letian, email=letian@111.com, password=123, blogs=null)
注意, INFO [main] - id:1, title:标题1, content:文本1和 INFO [main] - user: User(id=1, name=letian, email=letian@111.com, password=123, blogs=null)之间,mybatis输出了查找用户信息的日志,这就是延迟加载。